How to Draw How to Draw a Face Easy
28 Jan
How To Draw A Face Step By Step (Video Tutorial & Pictures Included)
Learning how to draw a face well is challenging for most artists.
Did you know that more than 95% of non-artists place the eyes too high on the head when drawing a face?
When you first start drawing, perhaps one of the hardest challenges you will face is figuring out how to draw a human face.
That's why we asked BioWars artist Gonçalo Lopes to create a step-by-step video tutorial to take you through the process of drawing a human face.
Even if you are an absolute beginner, you'll master the art of face drawing in no time with his expert guidance.
To make the whole learning process easier for you, Gonçalo created this helpful how-to-draw-a-face sheet. Feel free to download it and use it to follow Gonçalo's instructions with greater ease.
We also made a tutorial with pictures that will take you through the process of drawing a human face from sketch to adding fine details to your illustration.
Before we start, just keep one thing in mind — don't expect to become a great comic book artist overnight because that takes a lot of practice. But here are some tips to help you make the evolution from amateur to expert a whole lot easier.
Read the Biowars comic book!
The Tools You Will Need When Learning How To Draw A Face
From designing a car to building a home, every great creation starts with the right tools — and drawing is no exception.
While the supplies you will need to draw a realistic human face may seem self-explanatory, choosing the right set of tools might just make or break your efforts.
To draw a face, you will need:
- An H pencilfor the outlines and the basic shape
- An HB pencil for the more intricate details
- A 4B pencil for the shadows that add to the realistic look
- A kneaded eraser to accentuate the highlights and touch up the mistakes
- A ruler for precisely measured grid lines
- Sketch paper that features micro-perforations, making corrections easier
Meet the Bioverse characters!
How To Sketch A Face: 3 Steps To Get Started
Drawing a human face may seem challenging at first, especially if you're not an expert. After all, we have 43 face muscles and we can use them to make around 10,000 facial expressions, so it's no wonder so many people struggle to illustrate a face.
However, there are ways to simplify the process and make it easier for yourself.
For example, sketching a face is a great way to break the ice and loosen up your hand. Also, since a sketch is not a definitive drawing, you're less stressed out and more likely to enjoy drawing.
Now, let's see how to sketch a face!
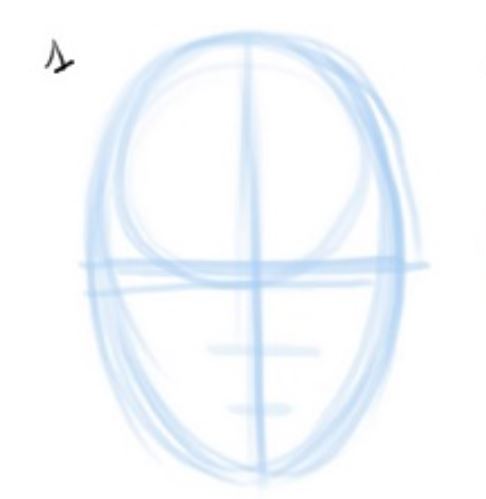
Step #1: Draw An Oval Head Shape
The first step to sketching a face is to draw an oval head shape. Simply picture an upside-dawn egg and sketch its shape on your paper.
For now, picture looking at your character's face head-on, and draw the shape from that angle.
Step #2: Segment The Sketch
Once you've made this basic shape, you'll want to add some lines that will help you place the eyes and the nose later on.
First, put a vertical line down the center of your drawing to divide the two halves of your character's face.
Then, add a horizontal line halfway between the top of the head and your character's chin. This will help provide some symmetry for the character's facial features and mark the space where the eyes will be drawn in later.
You can add two more vertical lines on either side of the center line to mark the corners of the eyes and the space for the nose. The eyes and the area in between them where the nose is are usually three equal spaces.
Step #3: Add More Guidelines To The Sketch
The next thing you should do is add some standard measurements to block out the rest of the face's features, including the eyebrows, ears and lips.
You previously added a horizontal line through the center of the sketch to mark where the eyes will be. You can now add another line above this midpoint to show where your character's eyebrows will be.
Next, place another horizontal line halfway between the line you just made and the bottom of the chin again. This is where the nose will eventually end and where the ears will be placed on the outside of your comic book character's face.
Now draw another horizontal line midway between the last line and the chin for the location of the mouth.
The first step to learning how to draw a face is drawing the basic head shape.
From here, you can really get a sense of how the face will be laid out— but should you need more assistance on where to put everything, you can add more lines as needed by following the image included below.
Each of the lines you make will help ensure your character's facial features are symmetrical and end up in a realistic spot.
Learn How To Draw The Rest Of Your Character!
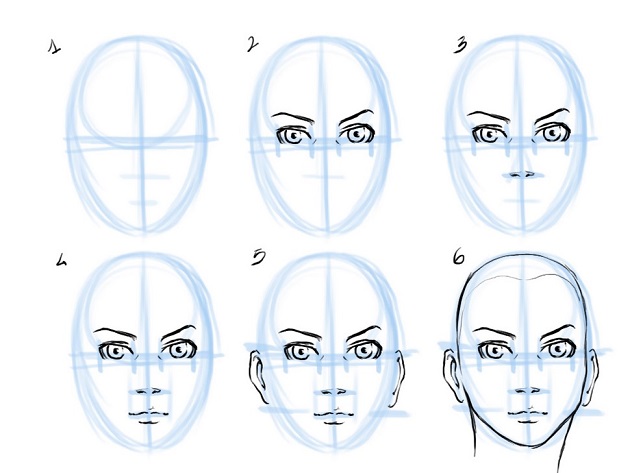
How To Draw A Face Step By Step: 5 Steps To Finesse The Details
Step #1: Draw The Eyes
Now that you've got your basic layout, it's time to start filling in the features of your comic book character.
Let's start from the top of the head down, to make things easier.
The proper proportion for a person's eyes, in most cases, is an eye's distance away from each other.
Begin by drawing your eye as a sideways oval, between the shorter vertical lines you drew earlier.
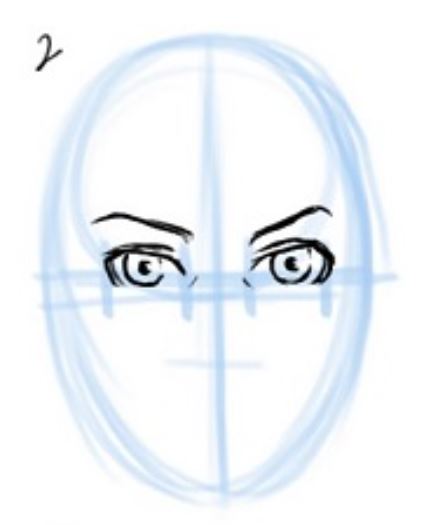
The space between the eyes should be roughly the same size as the eyes themselves.
As you draw the second eye, make sure the distance between them is roughly the same width as the eyes themselves. This gives you an ideal space for adding your character's nose.
Here's also our detailed guide on how to draw eyes realistically in just seven steps!
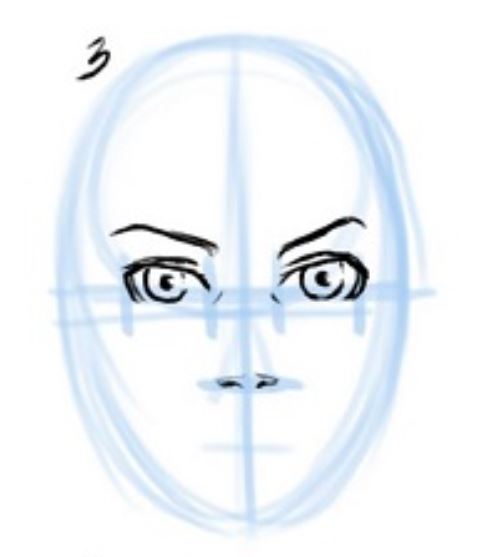
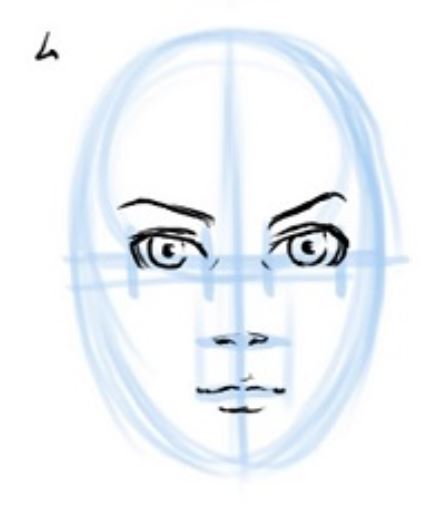
Step #2: Add The Nose To Your Face Drawing
Noses come in all shapes and sizes, but for our purposes today, we're going to focus on the basics.
First, your character's nose is going to end at the second horizontal line you drew earlier. This is your nose's length.
When it comes to your nose's width, you'll want to fill the gap you made earlier between the eyes — so the edges of the nostrils line up with where your character's eyes begin.
The exact shape of your character's nose is up to you. The nose is one feature that can give a specific personality to your drawing, so think of the shape that best suits the character you're drawing.
To learn how to draw a realistic nose in just five steps, check out our step-by-step guide created by Gonçalo!
Want to design something a little more high-tech? Find the perfect character creation software!
Step #3: Don't Forget The Eyebrows
If you followed our advice and added an additional horizontal line between the top of the head and the eye level, adding the eyebrows should be quite easy.
The browbone where the eyebrows are located on a human face always follows the lines of the nose — and that's why you should only tackle the eyebrows once your nose is in place.
Inner corners of both eyes should determine the nose's width while the nose's bridge helps define the brow bone.
Drawing the eyebrows is where the 4B pencil will come in handy. Go for short, soft strokes to make them bushy, or use long strokes for a more refined look.
And since eyebrows tend to be one of the darkest areas on a face drawing, don't forget to shade and blend them well!
Step #4: Draw The Mouth
Remember the third horizontal line you drew earlier? That's where you'll want to place your character's mouth.
Corners of the mouth usually line up with pupils.
As for the width of the mouth, a typical comic book character's mouth will start on either side at the center of each eye, or where the pupil is likely located.
Regarding the shape and the size of the lips, this is where you can get as creative as you want. You can make them full, thin, or anywhere in between – the choice is yours.
Just like the nose, lips can also help highlight the personality of your character.
We created a separate guide on mouth drawing, so you can explore each step in great detail!
Ready to create your own superhero or a villain? We'll guide you!
Step #5: Add The Ears, The Hair And The Final Touches
Drawing ears can seem complicated, but since you've already laid out a really great diagram to work with, illustrating them shouldn't pose too much of a problem.
Start just above the first horizontal line you made earlier, and end on the same line you used to complete the bottom of your character's nose.
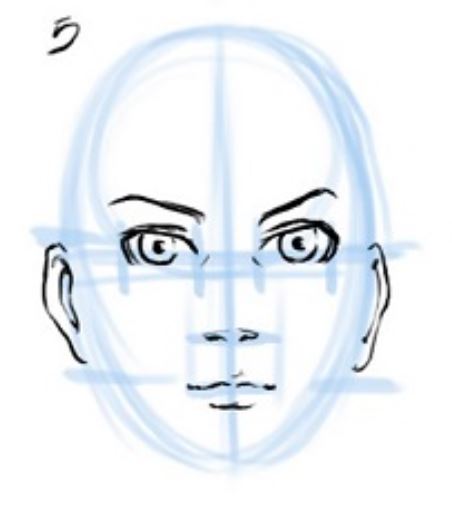
The top of the ears will generally align with pupils, while the bottom of the ears aligns with the nose or mouth line.
The top of the ears will generally align with pupils, while the bottom of the ears aligns with the nose or mouth line.
Don't worry about the details right now, just work on getting the basic shape of the ears down.
The hair, on the other hand, might be a bit more time-consuming and complicated to draw.
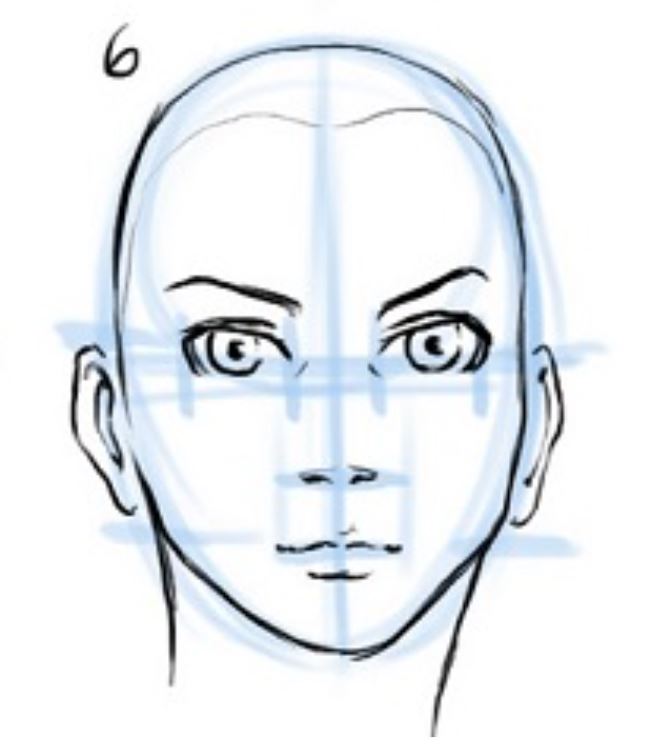
Hair helps express a character's personality.
You should first outline the hairline on the forehead and sides of the face with short strokes of the H pencil, following the natural hair growth pattern. Then, start adding volume and texture while moving toward the edges of the hairstyle.
The amount of detail you add to the hair is entirely up to you. For the purpose of this exercise, a general outline will do just fine.
But when you go back in later to add more detail, think about your character's personality and match that to their hairstyle.
Is your comic book character serious and professional?If it is, a slicked-back look might suit it best. On the other hand, if you wish to portray a wild and unpredictable character, curls or other types of untamed hairstyles might be the best choice.
Last but not least, don't forget about the finishing touches to your drawing:
- Erase the gridlines
- Add shadows where appropriate with your 4B pencil
- Lift up some highlights with your eraser
- Blend the key lines and textures
Once you take care of this, your basic human face drawing should be complete.
Thinking of creating your own comic book? This guide is for you!
Next: Learn How To Draw A Person!
Now that you know how to draw a face — and a hand from our previous tutorial, next comes learning how to draw a person!
We know that getting proportions, form and volume right may be challenging, but our guide will show you how to draw a person from scratch to the finest of details in nine simple steps.
Recap On How To Draw A Human Face
When you first start drawing human faces, remember to keep things simple and focus mostly on getting your proportions right.
As you get better at drawing proportional faces, you can begin experimenting with your character's features and adding finer details to express specific emotions and create distinct looks.
You can play with colors and textures until you achieve the desired look and draw a face exactly how you pictured it. The important thing is you stay consistent and keep on practicing until you perfect drawing different types of faces.
Have you ever tried to draw a face before? Which comic book character is your favorite to draw? Tell us in the comments below and feel free to send us your works!
Source: https://www.biowars.com/blog/how-to-draw-a-face-step-by-step/
Belum ada Komentar untuk "How to Draw How to Draw a Face Easy"
Posting Komentar